
Page 15 - Balloon Basics
P. 15
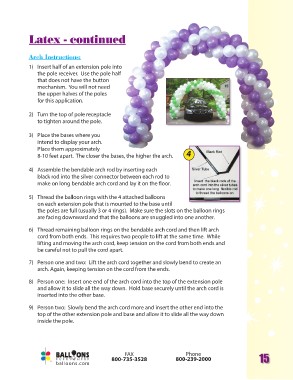
Latex - continued

Arch Instructions:

1)	 Insert half of an extension pole into
	 the pole receiver. Use the pole half
	 that does not have the button
	 mechanism. You will not need
	 the upper halves of the poles
	 for this application.

2)	 Turn the top of pole receptacle
	 to tighten around the pole.

3)	 Place the bases where you                                  4
	 intend to display your arch.
	 Place them approximately
	 8-10 feet apart. The closer the bases, the higher the arch.

4)	 Assemble the bendable arch rod by inserting each
	 black rod into the silver connector between each rod to
	 make on long bendable arch cord and lay it on the floor.

5)	 Thread the balloon rings with the 4 attached balloons
    on each extension pole that is mounted to the base until
    the poles are full (usually 3 or 4 rings). Make sure the slots on the balloon rings
    are facing downward and that the balloons are snuggled into one another.

6)	 Thread remaining balloon rings on the bendable arch cord and then lift arch
    cord from both ends. This requires two people to lift at the same time. While
    lifting and moving the arch cord, keep tension on the cord from both ends and
    be careful not to pull the cord apart.

7)	 Person one and two: Lift the arch cord together and slowly bend to create an
    arch. Again, keeping tension on the cord from the ends.

8)	 Person one: Insert one end of the arch cord into the top of the extension pole
    and allow it to slide all the way down. Hold base securely until the arch cord is
    inserted into the other base.

9)	 Person two: Slowly bend the arch cord more and insert the other end into the
    top of the other extension pole and base and allow it to slide all the way down
    inside the pole.

                                     800-7F3A5X-3528           800-P2h3o9n-e2000         15